First thing’s first: you need to figure out where your main water line comes into the house. Usually, it’s in the basement, garage, or near the water heater. This is your command center. You want to install the softener system before the water heater, but after the outdoor spigots (you don’t need to waste soft water on the lawn).
Now, here’s the big question: are you a DIY hero or more of a "call-a-friend" type? A basic whole-house system isn’t rocket science, but it does involve cutting copper pipe and using a soldering torch. If that makes you nervous, there’s zero shame in hiring a plumber for an hour.
Step 1: Gather Your Gear
You’ll need your softener unit (obviously), a bypass valve, some copper or PEX tubing, and a drain line for the backwash cycle. Most kits come with instructions, but a friendly tip: read them twice. It’s like assembling a slightly complex Lego set—satisfying but requires focus.
 Water Softener Plumbing Installation Diagram
Also grab a bucket and some towels. Water will probably spit at you a little. It’s not personal; it’s just excited to become soft.
Step 2: Find the Sweet Spot
Pick a spot near your main water line that’s dry, level, and close to a drain. You’ll route a small tube from the softener to that drain—it’s where the system flushes out the minerals it traps. This is the backwash, and it’s why the softener stays clean.
Make sure the unit isn’t too close to a heat source or in a freezing area. Soft water likes it chill, but not icy. Imagine a spa day, but for your pipes.
Step 3: Cut, Connect, and Clamp
Turn off the main water supply. Cut a section out of your copper pipe where the softener will go. Install the bypass valve first—this lets you switch back to hard water if you need to service the unit later. It’s your emergency exit.
Connect the softener’s inlet and outlet to the pipe using compression fittings or soldered joints. Double-check that the arrow on the unit matches the flow of your water. Water goes in from the main line and out to the house. Get this wrong, and it’s just a very expensive paperweight.
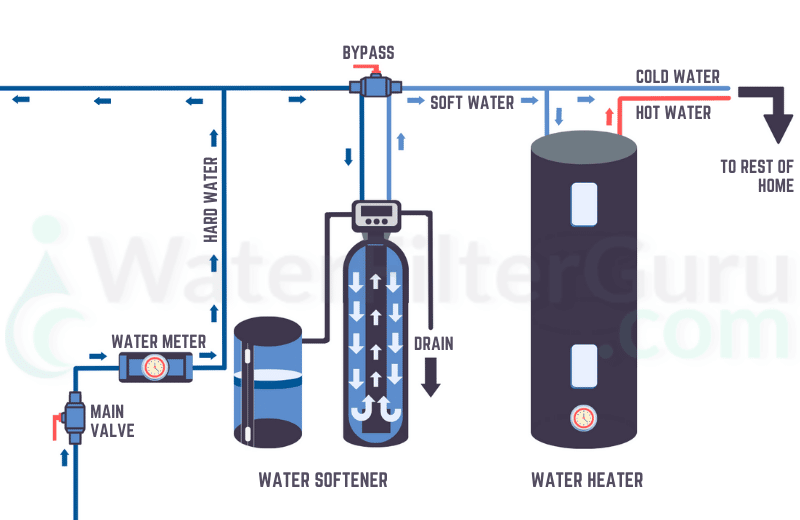 Residential Water Softener Installation Diagram: Setup Guide - DiagramInfo
Then, attach the drain tube from the softener to your drain line—just drop it into a floor drain or the top of a washing machine standpipe. Use a hose clamp so it doesn’t flop around like a loose noodle.
Step 4: The Magic Salt
Now for the fun part: fill the brine tank with water softener salt. It looks like big crystals or little pellets. Pour them in until they’re about two-thirds full. This salt is what recharges the resin beads inside the unit that actually trap the minerals.
It’s a simple chemical dance: the salty brine washes over the beads, kicking the calcium and magnesium out and into the drain, resetting them to grab more. You’re basically the DJ at a mineral party, and the salt is the clean-up crew.